You’re tired of hearing me talk about SMSLaser, I know. But let’s face it: I love these guys, I love the HFXC, and I definitely love that they’ve just announced a follow-on device.
No name for this device yet, but let’s talk about the high points:
It’s a 3-in-1 MFAL ala the PEQ-15, NGAL, IRIS, etc., with an IR illuminator, IR laser, and visible laser. It omits the white light that was on the HFXC.
It uses a center mount. The lasers looks like they will be slightly off-bore, but not a ton.
There is, supposedly, a built-in defuser cap.
The mode selector, battery compartment, and crane port are all on the sides of the device. This is reminiscent of the BE Meyers DAGIR.
It keeps the power level buttons, and centerlines the fire button, but now has a top-mounted slider to control the illuminator focus. Also on top: much bigger zeroing turrets.
It is supposedly going to CR123s. In a perfect world, I’d rather have 18350s, but it’s certainly workable.
It is still a somewhat sizable device compared to the IRIS or NGAL.
It is supposedly more waterproof than the HFXC.
They have implied it is coming out next month (July).
All in all, it looks pretty good, and will probably dominate the budget market just like the HFXC did. I’ll certainly be grabbing one as soon as they come out.
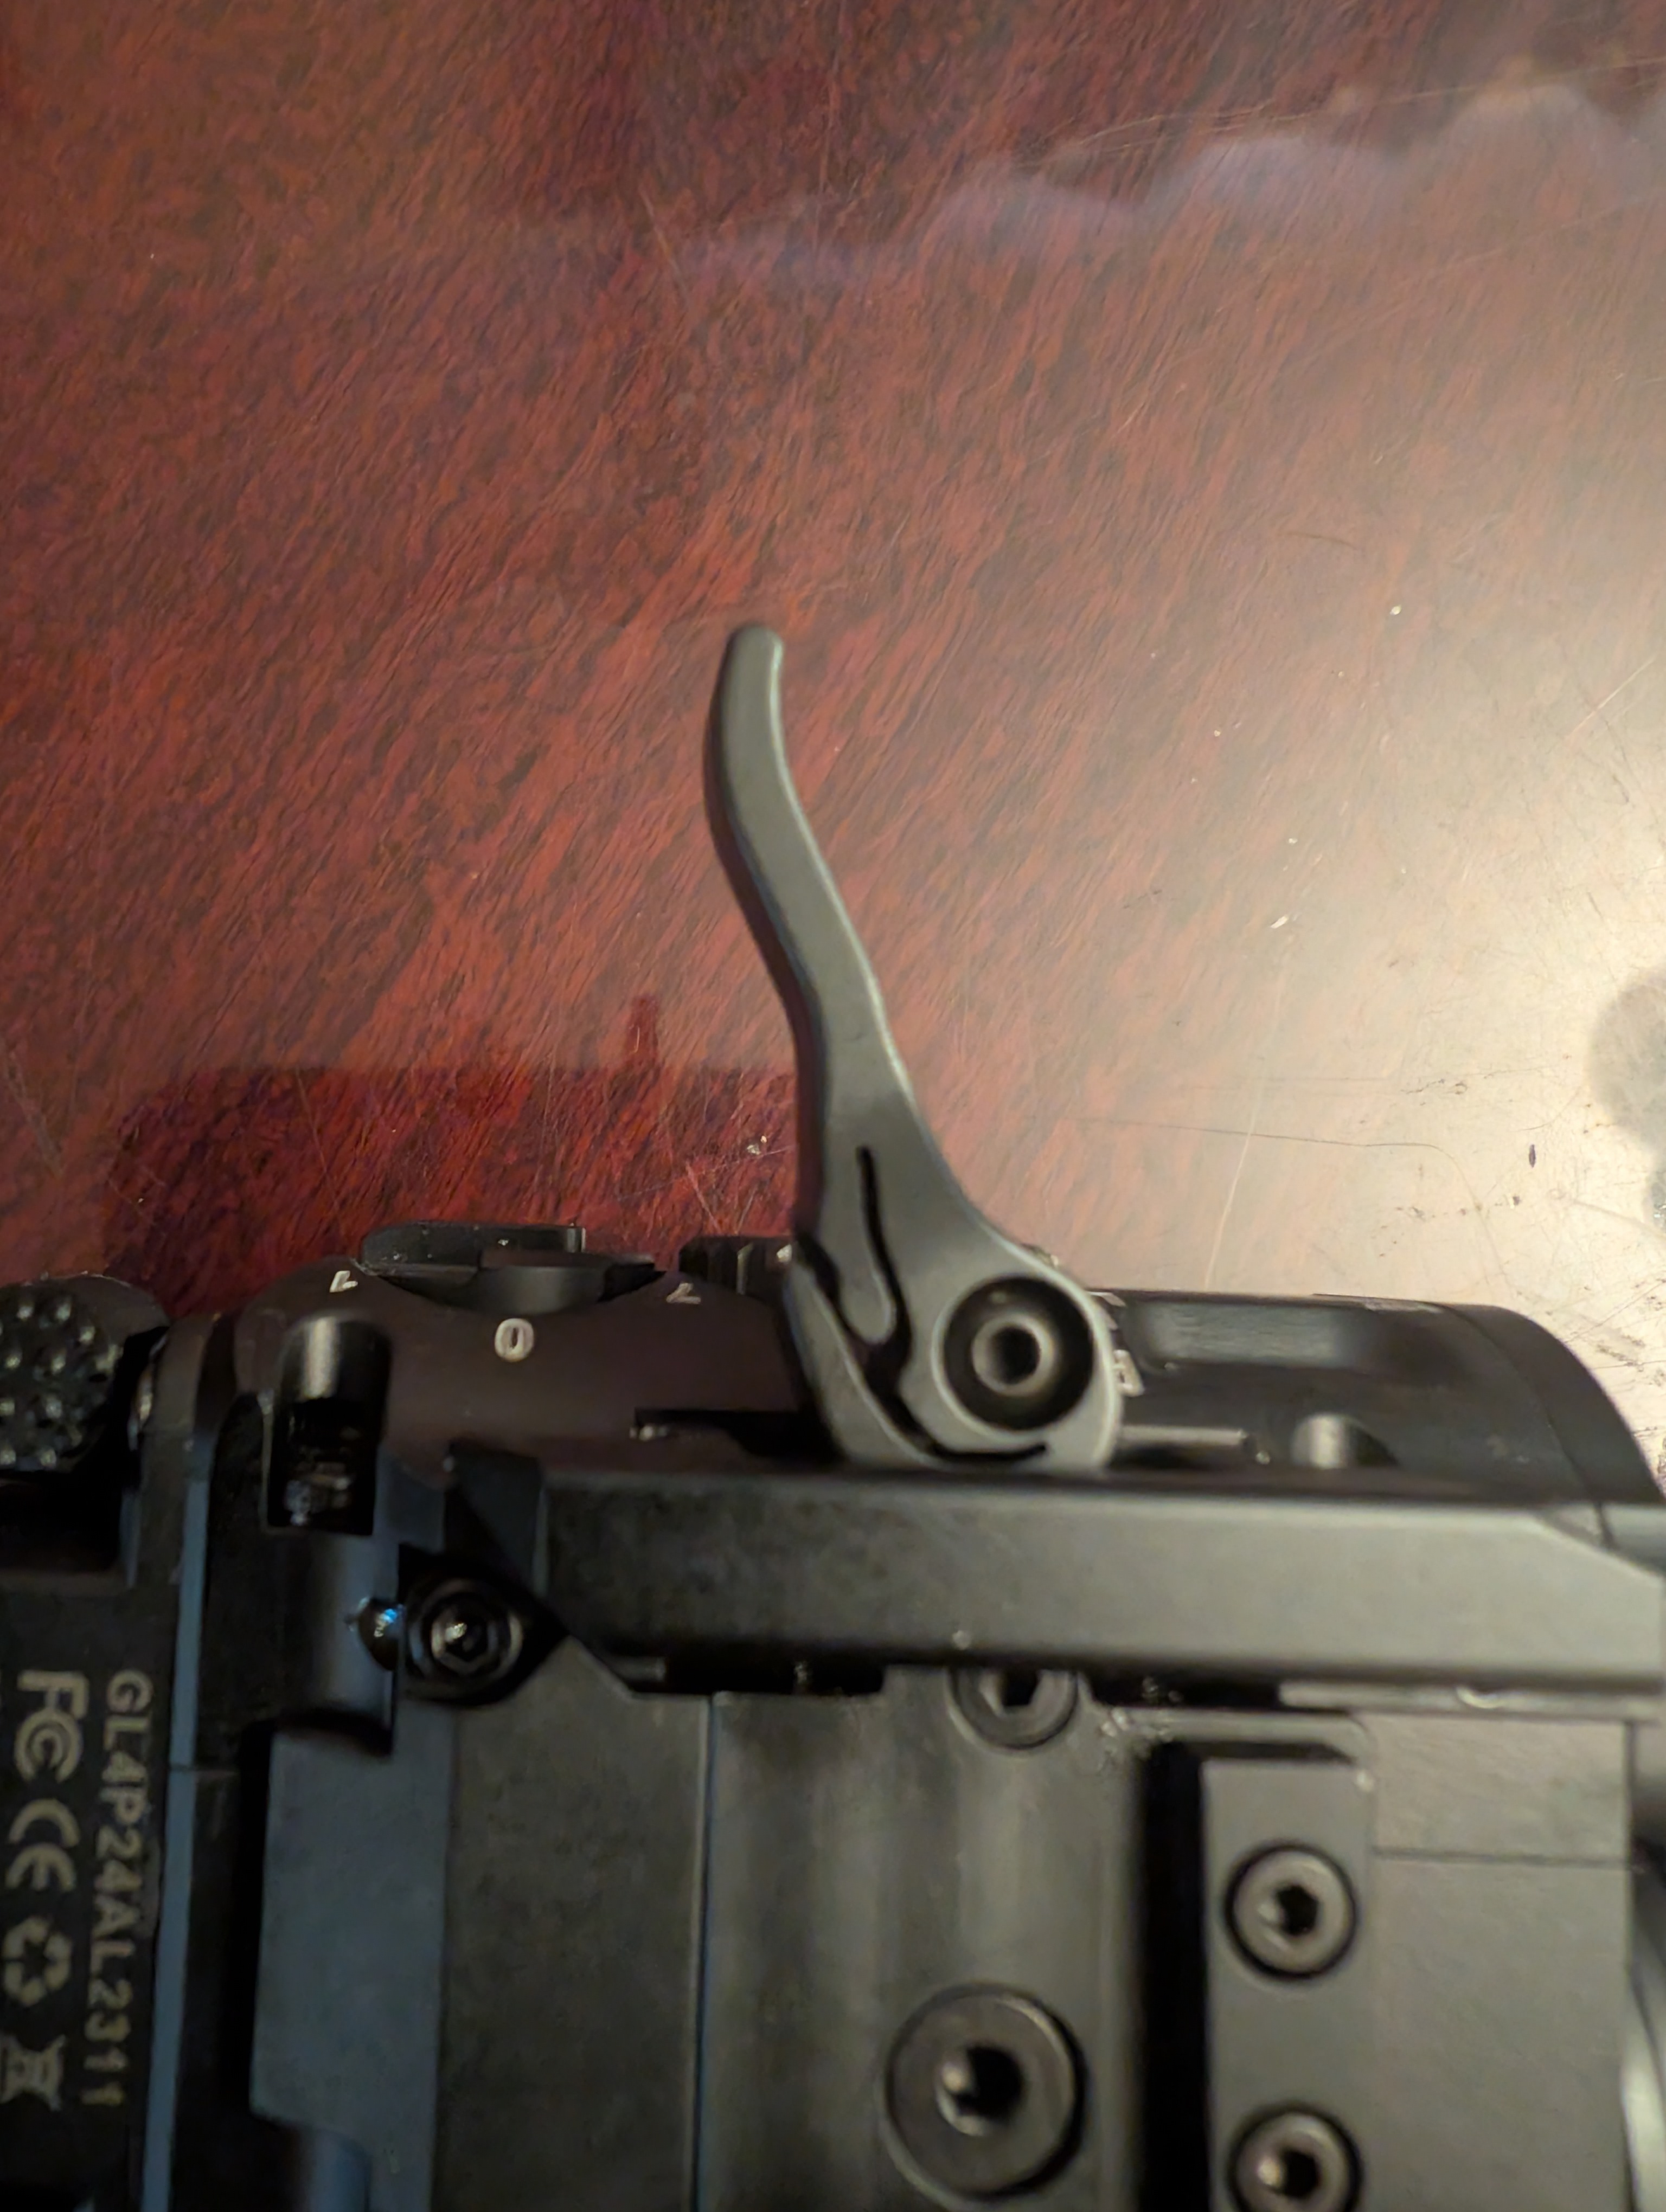
If you’re having problems with your RovyVon GL4 Pro not locking as tight to a Picatinny (1913) rail as tightly as it probably should, it’s not just you (assuming you’re using the right lug “key”). The first run of GL4 Pros appears to have had their rail grabber based on the (proprietary) Glock rail. This version of the grabber works really well with Glocks, but is just a teensy bit loose on Picatinny rails. You can sometimes shim it, which is what I did, but this winds up introducing some alignment issues, and is otherwise not a very satisfying solution.
But, good news: RovyVon has a new version of the lever that’s on newer GL4 Pros!
As you can see, the new lever has cut-outs that allow it to clamp MUCH harder. If you own an original GL4 Pro, you can email them for a warranty replacement if it’s causing you demonstrable problems.
As a reminder, the GL4 Pro is my budget go-to recommendation if you need “active IR” capabilities on a pistol. It’s under $300, it has very usable functionality across all its capabilities, and it’s more-or-less compatible with XVL2 holsters (sometimes with minor fitting).
It would also be my recommendation for shorty CCs… but I may have something else you should look at. Stay tuned.
Did you see my review of the GL4 Pro and go “yes, but only if it could perform Lasik surgery, too?” Well, RovyVon has you covered now.
The GL4 Pro XL is out for $500 right now. The GL4 Pro FP is out in May for $800. I won’t comment on the legality of these solutions, but will note that the GL4 Pro is more than adequate for most pistol range tasks, especially at night or indoors.
I’ve been off the night shooting circuit for a couple months due to work and family priorities, but I have finally been able to get back out and shooting recently – and I still love it!
I have been somewhat vocal in my questioning the utility of IR lasers and illuminators on handguns with reflex sights, but readily admit that they are quite a lot of fun to use. Further, if your reflex sight does down or comes loose, the lasers do provide a backup aiming method. Thus, even though I don’t necessarily think they’re a must-have, I’d still recommend them for anyone doing a lot of night vision shooting.
However, giving up your white light is not a great solution, either – so the preference would be a device that could combine both VIS and IR needs into one package. Surefire has this in the form of the XVL2-IRC, which is $1200. RovyVon, an EDC flashlight manufacturer, has come out with a close (but not exact) copy for $300 called the GL4 Pro. I’ve finally had time to test it, and I’d love to tell you what I think.
I like to experiment with oddball concepts, and while I freely admit that many (most?) don’t work out, I always learn something along the way.
My latest acquisition is a Meprolight Foresight optic. For those of you with short memories, this is a digital reflex sight that came out a few years ago. You configure it with an app, there’s a compass and level in it, there used to be a shot counter, etc. Unfortunately, it oozes unrealized potential because they never got around to adding features like custom reticles, configurable BDC, and so forth.
Anyways, one cool feature of the Foresight is essentially that it stores multiple zero configurations in the app that can be uploaded to your sight. This has obvious application for .300 BLK where supers and subs can have somewhat different zeroes. Being able to adjust zero for my chosen ammo with a few clicks seems nice. How can I leverage this on my night-fighting .300BLK gun? Will it work with NV?
You’ve seen me doing a lot of night vision related posts lately, mostly because that’s a shooting trend I’ve been deeply investing in. I still shoot competition as much as I can, but getting out to night vision shoots is a big priority for me now, too.
In my personal opinion, if you’re shooting with night vision, you need an “active” option for aiming. Passive is great, and I practice it often, but if you need to shoot on a cloudy night with no ambient IR to fall back on, you’re going to need to generate your own IR to see what you’re aiming at.
One budget option that has recently come to market is the SMSLaser XK68-IR. This is a ~$160 MFAL that provides visible laser, IR laser, and IR illuminator capabilities. I mounted it up on my AR-9 (running Maxim Defense Roller-Delayed Buffer) to see how it would work out.
Early on in my gun-owning journey, I bought a Saiga 12 and converted it to a 13″ barrel SBS. It’s a slick gun, albeit I think it’s been since eclipsed by some other contenders (especially the VEPR 12 and RIA VR80). I still enjoy shooting it as the opportunity presents.
Ever since I got into the night vision game, I’ve been a bit obsessed with the idea of a night vision-oriented shotgun. I don’t think the Saiga 12 the BEST choice (rock-and-lock in the dark is rough with shotgun magazines), but I think it’s respectable, and it’s what I’ve got. However, in order to get my Saiga 12 SBS into a night vision ready mode, some upgrades were in order.
First, it had an old-style Chaos tri-rail. There’s nothing wrong with that per se, but I felt that moving to MLOK would give me a lighter gun to compensate for the stuff I was about to bolt on to it. I went with the KS-12 TRSS handguard, which wasn’t overly expensive and fit my SBS tightly (always a good thing when you’re about to mount a laser).
Next, the optic needed an upgrade for passive aiming use, with better light transmission characteristics and night vision brightness modes. I had an AEMS Core (green) optic on a PCC I wasn’t using much, so I bought a low mount for it and put the AEMS on the Midwest Industries side rail sight mount. This gets it nice and high, but not so high as to be obnoxious when not using night vision. The AEMS is widely regarded to be the next best thing to an Eotech E/XPS3 for night vision use.
Then… lights and lasers. I wanted to retain the shotgun’s white light ability, thus the solutions needed to be able to go in the visible and IR spectrums.
For the laser, I decided to go with the Holosun LS221G I had previously bought for my .300BLK SBR (and replaced with a Somogear PEQ-15). While it’s not optimal, I decided to mount it on the right side of the handguard. I didn’t have a top rail, and for reasons you’ll read about later, I didn’t want to put it on the bottom rail. One funny note about the LS221G is that the turrets are all labeled for side mounting.
For the light, I decided to go with a classic: the Surefire KM2-C “Vampire” head on a Surefire body with a Surefire UE tailcap, mounted offset from the bottom of the handguard. This would give me good IR and white light flood, which is all I really need out of a shotgun.
Finally, for the switch, I used a leftover Unity TAPS Sync V4 switch, which gave me the choice of light+laser or just laser. Since both the laser unit and the light could be individually configured as white light or IR, this gave me a lot of flexibility in how I could configure the whole system – and would eliminate the possibility of negligent white light discharges. Very handy!
This setup worked really well. However, when I put my Salvo 12 on the gun, the suppressor blocked the KM2-C. The Salvo-12 is a rather oblong suppressor and has a lot of mass below the barrel – fine on a tube-fed shotgun, inconvenient on a mag-fed shotgun. This got me thinking: how could I build this gun so that I could further offset the light?
The solution I wound up with was to utilize a knockoff fusion hub with an offset rail mounted to the top of it, on the right hand side of the handguard. I then mounted the LS221G to the rail on the hub, and the light straight to the offset portion of the hub (up and towards the centerline).
This pushes the light out of the way of the laser unit and the suppressor, while not blocking the field of view for the optic. It looks weird, but it works great. The suppressor does cause some shadow in the light beam, but it seems pretty usable in general. Unfortunately, since I don’t always run a suppressor on this gun, I was reluctant to mount the light further forward using a wing.
I ran the shotgun at action shooting practice, and there was no discernable zero shift. That’s a testament to the LS221G, but it’s worth noting that I was also shooting slightly-spicy birdshot, not hard-kicking 3″ 000 buckshot. The recoil is pretty anemic with the suppressor on; you can run this gun pretty fast if you want to.
I’ve also run it at night. And it’s a ton of fun. Reloads suck in the dark, but just shooting it until it runs dry and transitioning to pistol is great. The IR setup works really well for what I need (which is shotgun distances).
Obviously, this is a for-funsies gun for the most part. Yes, I could press it into home defense use, and I’m sure it would excel, but it’s mostly there as an oddball gun to run at night shoots to see how a shotgun can break stage setups. I may send it out to Dissident Arms at some point for a VEPR magazine conversion to aid in reloads.
As you’ve seen in my more recent posts, I’ve been getting into the night vision game lately. Ironically, I’d say I’m still spending a lot more time doing competition shooting, but at least the two interests tend to have some skills overlap.
One of the things you quickly discover about the night vision world is that active aiming is awesome, and good IR illuminators are shockingly expensive. You can get a usable IR laser for reasonably cheap ($200-$300 for a Holosun LS117IR), but an IR illuminator that can really throw? That’s going to cost you.
But… what if there were a $250 unit that could give you co-aligned visible and IR lasers along with a reasonably good (but not amazing) IR illuminator? Well, maybe there is. I bought the Somogear PEQ-15 to check out whether this Chinese company broke the code. Did they? Read on.
After messing around with night vision a bit, I discovered that the amount of light you let in makes a huge difference in your ability to see detail at varying distances in different light conditions. There are a couple ways of dealing with this:
Flip-up lens cap systems, such as the Phokus Hoplite or the improved Butler Creek setups (sometimes involving 3D printed components)
Irises
My RNVG came with a flip-up system with a 3D printed “shutter”. It works well enough, but is not up to hard use. It’s also the wrong color, which offends my aesthetic sensibilities. I knew in my heart that I wanted an iris system. The problem with irises is that the go-to Matbock Tarsier Eclipses are hugely expensive – as in $250 each. While I’m not afraid of spending money when it’s called for, $500 for a couple irises seemed a bridge too far, especially when there had been some complaints that they were so tight that adjustment frequently adjusted focus. If I were using these in a duty context, sure, I’d buy the Matbock solution and then expense it to my unit.
However, with the power of the internet, I discovered there was a far cheaper way of approaching this problem. Here’s the recipe I used:
If you’re in a hurry, you can get the same irises off Amazon for 50% more, but if you use my recipe, it’s ~$50 for each tube. Besides the much more acceptable cost, one thing I really liked about this solution was how I had more finely-grained control over light, and how the sacrificial lens was screwed in (vs sandwiched in my previous setup). The amount of force needed to turn the diaphragm was also just right, and did not affect focus. They also look super cool, and if they get damaged, it’s a LOT less money that I’m out. I was quite impressed with the amount of thread engagement that each piece of this solution also had – the iris and lens are not going to be coming off by accident.
After getting some solid life lessons at my first night vision shoot, I bought some gear and went back to another event. Would you believe I found out some more?